Help with Spritekit position and anchorPoint
Spritekit nodes have position and anchorPoint CGPoint properties. I found the behaviour of these two properties confusing at first. Especially when adding multiple levels of children using SKNode’s addChild method. So here is a “cheat sheet” if you like, a visual helper that explains how it all works. If you’re as confused as I was then studying these examples should help.
You can download the code from my GitHub page.
One thing before you get started; in the examples below you’ll see functions like makeRedBox. These are just helpers to keep the code examples simple :
		-(SKSpriteNode *)makeRedBox:(CGSize)size {
return [[SKSpriteNode alloc] initWithColor:[UIColor redColor] size:size];
}
-(SKSpriteNode *)makeGreenBox:(CGSize)size {
return [[SKSpriteNode alloc] initWithColor:[UIColor greenColor] size:size];
}
-(SKSpriteNode *)makeBlueBox:(CGSize)size {
return [[SKSpriteNode alloc] initWithColor:[UIColor blueColor] size:size];
}
Test 1
			SKSpriteNode *box1 = [self makeRedBox:CGSizeMake(100, 100)];
box1.anchorPoint = CGPointMake(0,0);
box1.position = CGPointMake(100,100);

SKSpriteNode *box2 = [self makeBlueBox:CGSizeMake(50, 50)];
box2.anchorPoint = CGPointMake(0,0);
box2.position = CGPointMake(0,0);
[box1 addChild:box2];

SKSpriteNode *box3 = [self makeGreenBox:CGSizeMake(25, 25)];
box3.anchorPoint = CGPointMake(0,0);
box3.position = CGPointMake(0,0);
[box2 addChild:box3];

[self addChild:box1];

- Red’s size is 100 x 100 which makes it easy to understand its children positioning
- Blue is 50 x 50 and green is 25 x 25.
- Red’s anchor is 0,0 which means that the bottom left pixel is at position 100,100 on the screen.
- All children are also at 0,0 (relative to the parent’s position).
Test 2
SKSpriteNode *box1 = [self makeRedBox:CGSizeMake(100, 100)];
box1.anchorPoint = CGPointMake(0.5,0.5);
box1.position = CGPointMake(100,100);

SKSpriteNode *box2 = [self makeBlueBox:CGSizeMake(50, 50)];
box2.anchorPoint = CGPointMake(0,0);
box2.position = CGPointMake(0,0);
[box1 addChild:box2];

SKSpriteNode *box3 = [self makeGreenBox:CGSizeMake(25, 25)];
box3.anchorPoint = CGPointMake(0,0);
box3.position = CGPointMake(0,0);
[box2 addChild:box3];

[self addChild:box1];

- All that’s changed is red’s anchor is now 0.5,0.5 which represents the exact centre. Anchors go from 0,0 (bottom left to 1,1 (top right).
- Red’s position is still 100,100.
- Blue and green are still in the exact same place as test 1.
- Only red has moved, the anchor point change means that now the centre of red is at position 100,100 instead of the bottom left pixel.
Test 3
SKSpriteNode *box1 = [self makeRedBox:CGSizeMake(100, 100)];
box1.anchorPoint = CGPointMake(0.5,0.5);
box1.position = CGPointMake(100,100);

SKSpriteNode *box2 = [self makeBlueBox:CGSizeMake(50, 50)];
box2.anchorPoint = CGPointMake(0,0);
box2.position = CGPointMake(25,25);
[box1 addChild:box2];

SKSpriteNode *box3 = [self makeGreenBox:CGSizeMake(25, 25)];
box3.anchorPoint = CGPointMake(0,0);
box3.position = CGPointMake(0,0);
[box2 addChild:box3];

[self addChild:box1];

- Remember that red’s centre is the new anchor point for it’s children.
- All I’ve done is I’ve move the position of blue to 25,25 (a quarter of red’s width/height).
- So blue has moved diagonally upwards away from the centre.
- Remember that positive Y changes go upwards in Spritekit.
Test 4
SKSpriteNode *box1 = [self makeRedBox:CGSizeMake(100, 100)];
box1.anchorPoint = CGPointMake(0.5,0.5);
box1.position = CGPointMake(100,100);

SKSpriteNode *box2 = [self makeBlueBox:CGSizeMake(50, 50)];
box2.anchorPoint = CGPointMake(0.5,0.5);
box2.position = CGPointMake(25,25);
[box1 addChild:box2];

SKSpriteNode *box3 = [self makeGreenBox:CGSizeMake(25, 25)];
box3.anchorPoint = CGPointMake(0,0);
box3.position = CGPointMake(0,0);
[box2 addChild:box3];

[self addChild:box1];

- So blue’s position is still the same but it’s moved back down. How has this happened?
- Blue’s anchor point has changed to 0.5,0.5 which means that the centre of blue is now at the position 25,25 instead of the bottom left 0,0.
- Green is in the same position, still relative to the blue’s position (which hasn’t changed).
Test 5
SKSpriteNode *box1 = [self makeRedBox:CGSizeMake(100, 100)];
box1.anchorPoint = CGPointMake(0.5,0.5);
box1.position = CGPointMake(100,100);

SKSpriteNode *box2 = [self makeBlueBox:CGSizeMake(50, 50)];
box2.anchorPoint = CGPointMake(0.5,0.5);
box2.position = CGPointMake(25,25);
[box1 addChild:box2];

SKSpriteNode *box3 = [self makeGreenBox:CGSizeMake(25, 25)];
box3.anchorPoint = CGPointMake(0.5,0.5);
box3.position = CGPointMake(0,0);
[box2 addChild:box3];

[self addChild:box1];
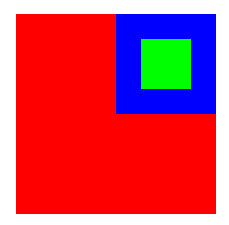
- Green still has the exact same position.
- But the anchor point is now its centre, so the centre of green now sits at it’s position.
- The position of a node is always centred on the anchor position of a node.
- A node’s default anchor is 0,0 so the bottom left will always be at its position unless you change the anchor.
Test 6
SKSpriteNode *box1 = [self makeRedBox:CGSizeMake(100, 100)];
box1.anchorPoint = CGPointMake(0.5,0.5);
box1.position = CGPointMake(100,100);

SKSpriteNode *box2 = [self makeBlueBox:CGSizeMake(50, 50)];
box2.anchorPoint = CGPointMake(0.5,0.5);
box2.position = CGPointMake(25,25);
[box1 addChild:box2];

SKSpriteNode *box3 = [self makeGreenBox:CGSizeMake(25, 25)];
box3.anchorPoint = CGPointMake(0.5,0.5);
box3.position = CGPointMake(0,-50);
[box2 addChild:box3];

[self addChild:box1];
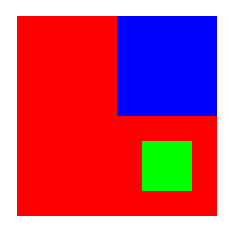
- Aaargh what’s going on!?
- Green’s position has been moved down 50 points (half the square in this example)
- Green’s position is relative to blue’s position.
- Blue’s anchor position (centre) disguises the fact that blue’s position is really it’s centre.
- 50 points down from blue’s centre is the centre of green.
- But why the centre of the green? It’s because green’s anchor point is 0.5,0.5.
- Anchor’s mean that what you are looking at doesn’t always make sense if you only think about positions.
- I’d love to see a debug option in Spritekit that shows node positions as little crosses.
Test 7
SKSpriteNode *box1 = [self makeRedBox:CGSizeMake(100, 100)];
box1.anchorPoint = CGPointMake(0.5,0.5);
box1.position = CGPointMake(100,100);

SKSpriteNode *box2 = [self makeBlueBox:CGSizeMake(50, 50)];
box2.anchorPoint = CGPointMake(0.5,0.5);
box2.position = CGPointMake(25,25);
[box1 addChild:box2];

SKSpriteNode *box3 = [self makeGreenBox:CGSizeMake(25, 25)];
box3.anchorPoint = CGPointMake(0,0);
box3.position = CGPointMake(0,-50);
[box2 addChild:box3];

[self addChild:box1];
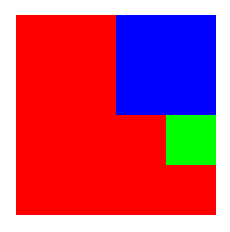
- Finally I just set the green anchor to 0,0 to make test 6 a bit clearer.
- Remember that an anchor of 0,0 means that the node’s bottom left pixel is over the node’s position.
- Green is relative to the anchor point of blue.
- Blue’s anchor point is it’s centre (0.5, 0.5).
- The centre of blue -50 points is right there are the bottom left of green.
Test 8
SKSpriteNode *box1 = [self makeRedBox:CGSizeMake(100, 100)];
box1.anchorPoint = CGPointMake(0.5,0.5);
box1.position = CGPointMake(100,100);

SKSpriteNode *box2 = [self makeBlueBox:CGSizeMake(50, 50)];
box2.anchorPoint = CGPointMake(0.5,0.5);
box2.position = CGPointMake(25,25);
[box1 addChild:box2];

SKSpriteNode *box3 = [self makeGreenBox:CGSizeMake(25, 25)];
box3.anchorPoint = CGPointMake(0,0);
box3.position = CGPointMake(0,-50);
box3.zRotation = 0.7871; // About 90 degrees
[box2 addChild:box3];

[self addChild:box1];
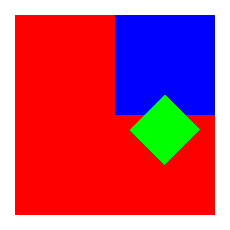
- All I’ve done is rotate green by 90 degrees.
- Greens anchor is 0,0 ie; the bottom left.
- The anchor point is the centre for rotations, you can see that the bottom left of green is still at the same position.
- Green has been rotated from the bottom left by 90 degrees.
Test 9
SKSpriteNode *box1 = [self makeRedBox:CGSizeMake(100, 100)];
box1.anchorPoint = CGPointMake(0.5,0.5);
box1.position = CGPointMake(100,100);

SKSpriteNode *box2 = [self makeBlueBox:CGSizeMake(50, 50)];
box2.anchorPoint = CGPointMake(0.5,0.5);
box2.position = CGPointMake(25,25);
[box1 addChild:box2];

SKSpriteNode *box3 = [self makeGreenBox:CGSizeMake(25, 25)];
box3.anchorPoint = CGPointMake(0.5,0.5);
box3.position = CGPointMake(0,-50);
box3.zRotation = 0.7871; // About 90 degrees
[box2 addChild:box3];

[self addChild:box1];
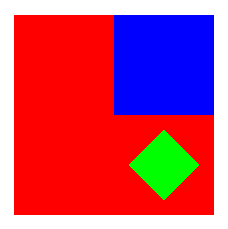
- This is the same as test 6 but with a 90 degrees rotation on green.
- In test 6 green’s anchor is 0.5, 0.5.
- This means that green is rotated 90 degrees from its centre.
Test 10
SKSpriteNode *box1 = [self makeRedBox:CGSizeMake(100, 100)];
box1.anchorPoint = CGPointMake(0.5,0.5);
box1.position = CGPointMake(100,100);

SKSpriteNode *box2 = [self makeBlueBox:CGSizeMake(50, 50)];
box2.anchorPoint = CGPointMake(0.5,0.5);
box2.position = CGPointMake(25,25);
box2.zRotation = 0.7871; // About 90 degrees
[box1 addChild:box2];

SKSpriteNode *box3 = [self makeGreenBox:CGSizeMake(25, 25)];
box3.anchorPoint = CGPointMake(0.5,0.5);
box3.position = CGPointMake(0,-50);
box3.zRotation = 0.7871; // About 90 degrees
[box2 addChild:box3];

[self addChild:box1];
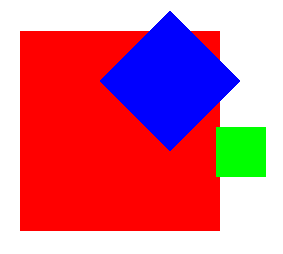
- This is the same as test 9, but I thought “What happens if I rotate blue by 90 degrees too?”
- Blue is rotated from its centre because its anchor point is 0.5, 0.5.
- Because green is a child of blue it gets rotated 90 degrees around from blue’s centre.
Backbone.ModalDialog.js v0.3
Recently at work I gave my Backbone.js modal dialog a good run out on a fairly complex edit profile screen. Each distinct element of a user’s profile is editable separately in a modal dialog. I made a few changes along the way so now here’s the 0.3 release.
The changes in v0.3 are :
- Added option showModalAtScrollPosition (default true) to determine whether the modal dialog is displayed so it is visible in a scrolled viewport (a sensible default), or is displayed at the top of the document where it might be invisible if the window has been scrolled down.
- Fixed a problem where the opaque blanket div didn’t cover the entire screen when the window was scrolled. The modal blanket div’s height is recalculated every time a dialog is displayed (in case the window height has changed since last time).
- Added the recentre() function which you can call to recentre a modal dialog in case the content has changed. Useful if errors messages have been added for example. Americans can use recenter().
- Improved how the positioning works.
- The showModal() function now returns this.
- Added validation to the demo using Thomas Pederson’s excellent backbone.validation.js.
See the demo page live in action.
Backbone.ModalDialog.js v0.2
I’ve made a few changes to my Backbone.js modal dialog plugin. I’m using it in my own web app and I needed to make some changes and hopefully others will need them too.
Here’s a quick demo :
The new features are :
- Added option to render the modal dialog into a given container element allowing relative absolute positioning.
- Added option to slide the modal dialog down from above or up from below.
- You can now provide an css properties to be applied to the modal dialog.
- Clicking on a jQuery ui calender control no longer causes the modal dialog to close.
- Improved the default position of the modal dialog to be more central.
Happy modalizing.
PS: The YouTube video quality is quite poor isn’t it, looks ok outside of YouTube. What’s wrong with it? Can anyone recommend a YouTube compatible screen capture app?
